初始化 1 yum install -y net-tools
1.2、安装 wget 1.3、安装 vim 1.4、同步时间 1 2 3 4 5 6 7 8 9 10 11 12 13 14 15 16 17 18 19 20 21 22 23 # 安装ntpdate yum -y install ntpdate # 同步时间 ntpdate -u pool.ntp.org # 同步完成后,date 命令查看时间是否正确 date # 中国 cn.ntp.org.cn # 中国香港 hk.ntp.org.cn # 美国 us.ntp.org.cn # 安装crontab yum -y install crontab # 创建crontab任务 crontab -e # 添加定时任务 */20 * * * * /usr/sbin/ntpdate pool.ntp.org > /dev/null 2>&1 # 重启crontab service crond reload
1.5、安装 yum 源 1.5.1、腾讯源</div>color2 参考地址:https://cloud.tencent.com/document/product/213/2046 </div>
备份原始文件
1 2 mkdir /etc/yum.repos.d/backup mv /etc/yum.repos.d/*.repo /etc/yum.repos.d/backup/
下载 CentOS 7 的 repo 文件
1 2 3 4 5 6 centos6: wget -O /etc/yum.repos.d/CentOS-Base.repo https://mirrors.cloud.tencent.com/repo/centos6_base.repo centos7: wget -O /etc/yum.repos.d/CentOS-Base.repo https://mirrors.tencent.com/repo/centos7_base.repo centos stream 8/9:用镜像中自带的 repo 文件即可。
生成缓存
1 yum clean all && yum makecache
1.5.2、阿里源
备份原始文件
1 cp /etc/yum.repos.d/CentOS-Base.repo /etc/yum.repos.d/CentOS-Base.repo.bak
下载 CentOS 7 的 repo 文件
1 wget --no-check-certificate -O /etc/yum.repos.d/CentOS-Base.repo https://mirrors.aliyun.com/repo/Centos-7.repo
或者
1 curl -o /etc/yum.repos.d/CentOS-Base.repo https://mirrors.aliyun.com/repo/Centos-7.repo
备注:其余系统下载地址如下所示
- centos6
1 wget --no-check-certificate -O /etc/yum.repos.d/CentOS-Base.repo https://mirrors.aliyun.com/repo/Centos-6.repo
或者
1 curl -o /etc/yum.repos.d/CentOS-Base.repo https://mirrors.aliyun.com/repo/Centos-6.repo
- centos8
1 wget --no-check-certificate -O /etc/yum.repos.d/CentOS-Base.repo https://mirrors.aliyun.com/repo/Centos-8.repo
或者
1 curl -o /etc/yum.repos.d/CentOS-Base.repo https://mirrors.aliyun.com/repo/Centos-8.repo
非阿里云 ECS 用户会出现 Couldn’t resolve host ‘mirrors.cloud.aliyuncs.com’ 信息,不影响使用。用户也可自行修改相关配置
1 sed -i -e '/mirrors.cloud.aliyuncs.com/d' -e '/mirrors.aliyuncs.com/d' /etc/yum.repos.d/CentOS-Base.repo
使用阿里开源镜像提供的 epel 源
1 wget --no-check-certificate -O /etc/yum.repos.d/epel-7.repo http://mirrors.aliyun.com/repo/epel-7.repo
清除缓存
生成缓存
1.6、生成 SSH key 1 ssh-keygen -t rsa -C "xxxxx@qq.com"
1.7、安装 zerotier(选装) 1 2 # 下载脚本并安装 curl -s https://install.zerotier.com | sudo bash
1.8、安装 v2ray(选装) 参考网址
1 2 3 4 5 6 7 8 9 10 11 12 # 1、下载脚本并安装 bash <(curl -s -L https://git.io/v2ray.sh) # 2、输入 “1” 进行安装 # 3、选择传输协议:TCP # 4、设置端口号 # 5、广告拦截:选N # 6、开启SS:选N
安装宝塔面包(选装)</div>color2 安装地址:https://www.bt.cn/new/download.html </div>
1 yum install -y wget && wget -O install.sh http://download.bt.cn/install/install_6.0.sh && sh install.sh
安装 Java 环境(可选) 1 2 3 4 5 6 7 8 9 10 11 12 13 14 15 16 17 18 19 20 # 1.安装上传组件 yum -y install lrzsz # 2.上传文件并解压 rz mkdir -p /usr/java tar -zxvf jdk-8u281-linux-x64.tar.gz -C /usr/java # 3.设置环境变量 vim /etc/profile export JAVA_HOME=/usr/java/jdk1.8.0_281 export PATH=$JAVA_HOME/bin:$PATH export CLASSPATH=.:$JAVA_HOME/lib/dt.jar:$JAVA_HOME/lib/tools.jar # 4.让环境变量生效 source /etc/profile # 5.验证 java -version
安装 docker 环境(可选)
PS:一定要 yum update -y 一下,否则可能会出现宿主机访问不到容器的问题
3.1、安装 docker docker 官方安装文档
3.1.1、删除旧软件包 1 2 3 4 5 6 7 8 sudo yum remove docker \ docker-client \ docker-client-latest \ docker-common \ docker-latest \ docker-latest-logrotate \ docker-logrotate \ docker-engine
3.1.2、设置repository 1 sudo yum install -y yum-utils
1 2 3 sudo yum-config-manager \ --add-repo \ https://download.docker.com/linux/centos/docker-ce.repo
3.1.3 安装 docker 容器 1 sudo yum install docker-ce docker-ce-cli containerd.io
3.1.4、启动 docker 并加入开机自启
启动 docker
1 sudo systemctl start docker
加入开机自启
1 sudo systemctl enable docker
3.1.5、设置国内源 3.1.5.1、创建文件夹 1 sudo mkdir -p /etc/docker
3.1.5.2、设置 daemon.json 1 2 3 4 5 6 sudo tee /etc/docker/daemon.json <<-'EOF' { "registry-mirrors": ["https://ft4regk8.mirror.aliyuncs.com"], "insecure-registries": ["http://harbor.khalidlife.com:10102","10.10.7.161:10102"] } EOF
常规设置:
1 2 3 4 5 sudo tee /etc/docker/daemon.json <<-'EOF' { "registry-mirrors": ["https://ft4regk8.mirror.aliyuncs.com"] } EOF
3.1.5.3、重载 systemctl 1 sudo systemctl daemon-reload
3.1.5.4、重启 docker 1 sudo systemctl restart docker
3.1.6、打开 docker 远程连接 3.1.6.1、打开文件 1 vim /usr/lib/systemd/system/docker.service
3.1.6.2、添加参数 在/usr/lib/systemd/system/docker.service,配置远程访问。
主要是在[Service]这个部分,加上下面两个参数-H tcp://0.0.0.0:2375 -H unix://var/run/docker.sock
1 ExecStart=/usr/bin/dockerd -H fd:// --containerd=/run/containerd/containerd.sock -H tcp://0.0.0.0:2375 -H unix://var/run/docker.sock
3.1.6.3、重载 systemctl 1 sudo systemctl daemon-reload
3.1.6.4、重启 docker 1 sudo systemctl restart docker
3.1.6.5、查看状态 1 curl http://localhost:2375/version
3.2、安装 docker-compose docker-compose 官方安装文档
3.2.1、下载 docker-compose 1 sudo curl -L "https://github.com/docker/compose/releases/download/1.29.2/docker-compose-$(uname -s)-$(uname -m)" -o /usr/local/bin/docker-compose
3.2.2、设置执行权限 1 sudo chmod +x /usr/local/bin/docker-compose
3.2.3、设置软连接 1 sudo ln -s /usr/local/bin/docker-compose /usr/bin/docker-compose
3.2.4、测试 1 docker-compose --version
安装 python 环境(Anaconda ) 4.1、Anaconda 下载 进入 anaconda 官方网站下载个人免费版本,点击 download,选择 Linux 平台的安装包
官网链接:Anaconda 官网下载
内网链接:
- [linux链接](https://zdir.khalidlife.cn/soft/环境/python环境/Anaconda/Anaconda3-2022.10-Linux-x86_64.sh)
- [Windows链接](https://zdir.khalidlife.cn/soft/环境/python环境/Anaconda/Anaconda3-2022.10-Windows-x86_64.exe)
- [Mac链接](https://zdir.khalidlife.cn/soft/环境/python环境/Anaconda/Anaconda3-2022.10-MacOSX-x86_64.pkg)
4.2、Anaconda 安装 4.2.1、执行如下指令,安装 anaconda 1 2 bash Anaconda3-2020.11-Linux-x86_64.sh -p /opt/anaconda3
4.2.2、按照安装提示,键入回车 1 2 Please, press ENTER to continue >>> ENTER
4.2.3、安装此版本时,会强制用户看完整个协议,直接一路回车就行,直到看到确认信息 1 2 3 Do you accept the license terms? [yes |no][no] >>> yes
4.2.4、确认安装路径(可修改,也可以使用自定义) 1 2 3 4 5 6 7 8 9 Anaconda3 will now be installed into this location: /root/anaconda3 - Press ENTER to confirm the location - Press CTRL-C to abort the installation - Or specify a different location below [/root/anaconda3] >>> /opt/anaconda3
注:安装位置可以在执行安装脚本的时候直接指定,可以这样修改执行内容:
1 bash Anaconda3-2020.11-Linux-x86_64.sh -p /opt/anaconda3
这样可跳过软件安装路径确认阶段,直接安装到指定目录下。
4.2.5、环境变量初始化 1 2 3 4 5 6 Do you wish the installer to initialize Anaconda3 by running conda init? [yes |no][no] >>> yes
4.2.6、初始化时,anaconda 将配置写入了~/.bashrc 文件,直接执行 后即可正常使用了。
4.2.7、配置多用户使用 将 anaconda 初始化时,写入到 ~/.bashrc 文件中的内容复制到 /etc/bashrc 文件中,内容如下(此处仅为示例,请复制本机对应文件中的相应内容)
1 2 3 4 5 6 7 8 9 10 11 12 13 14 __conda_setup="$('/opt/anaconda3/bin/conda' 'shell.bash' 'hook' 2> /dev/null) " if [ $? -eq 0 ]; then eval "$__conda_setup " else if [ -f "/opt/anaconda3/etc/profile.d/conda.sh" ]; then . "/opt/anaconda3/etc/profile.d/conda.sh" else export PATH="/opt/anaconda3/bin:$PATH " fi fi unset __conda_setup
再执行 source /etc/bashrc 指令即可。
4.3、配置镜像源 conda 配置镜像源:
使用 conda 进行安装时,访问的是国外的网络,所以下载和安装包时会特别慢。我们需要更换到国内镜像源地址,这里我更换到国内的清华大学地址。(永久添加镜像)
Windows 和 Linux 对于 conda 修改镜像源的方法一样
4.3.1、查看 anaconda 中已经存在的镜像源 1 conda config --show channels
4.3.2、添加镜像源(永久添加) 1 2 3 conda config --add channels https://mirrors.tuna.tsinghua.edu.cn/anaconda/pkgs/free/ conda config --add channels https://mirrors.tuna.tsinghua.edu.cn/anaconda/pkgs/main/ conda config --add channels https://mirrors.tuna.tsinghua.edu.cn/anaconda/cloud/conda-forge/
4.3.3、设置搜索时显示通道地址 1 conda config --set show_channel_urls yes
4.3.4、若不想按照上述步骤添加镜像,可使用以下命令直接指定安装时使用的镜像地址(以 opencv 为例): 1 conda install opencv -c https://mirrors.tuna.tsinghua.edu.cn/anaconda/pkgs/main/
4.3.5、添加完后查看 1 conda config --show channels
4.3.6、pip 使用国内镜像源 一般在使用 conda install 安装时会出现包无法找到或者安装失败的情况,此时可以使用 pip install 来尝试安装(以 opencv 为例):
若安装速度过慢可单独指定安装镜像加快安装:
1 pip install opencv -i https://mirrors.aliyun.com/pypi/simple/
此处列举国内常用 pip 安装镜像:
1 2 3 4 5 6 7 8 9 10 11 12 13 14 15 channels: - defaults show_channel_urls: true default_channels: - https://mirrors.tuna.tsinghua.edu.cn/anaconda/pkgs/main - https://mirrors.tuna.tsinghua.edu.cn/anaconda/pkgs/free - https://mirrors.tuna.tsinghua.edu.cn/anaconda/pkgs/r - https://mirrors.tuna.tsinghua.edu.cn/anaconda/cloud/Paddle/ custom_channels: conda-forge: https://mirrors.tuna.tsinghua.edu.cn/anaconda/cloud msys2: https://mirrors.tuna.tsinghua.edu.cn/anaconda/cloud bioconda: https://mirrors.tuna.tsinghua.edu.cn/anaconda/cloud menpo: https://mirrors.tuna.tsinghua.edu.cn/anaconda/cloud pytorch: https://mirrors.tuna.tsinghua.edu.cn/anaconda/cloud simpleitk: https://mirrors.tuna.tsinghua.edu.cn/anaconda/cloud
3.3、root 用户安装的 anaconda 如何给普通用户使用 服务器里安装了 anaconda,结果发现只有 root 用户才能使用,其他的用户都无法使用 conda 命令!
【解决方案】
首先,root 用户安装 anaconda 的时候,需要安装在普通用户可以访问的目录下,比如/usr/local、/opt、/home 之类的
其次,普通用户登陆后,需要执行以下 conda init 使 conda 的路径等系统环境变量信息写入当前用户的 bashrc 下
例:
anaconda 装在了 (需要查看 anaconda3 安装路径)
普通用户 需要执行
1 /opt/anaconda3/bin/conda init bash
你需要根据自己的实际情况修改 bin 之前的目录
普通用户再执行启用配置命令
然后重新连接 SSH (推荐)
或者
即使你没有重新连接 ssh 也可以通过(没试过)
或
能正常使用 conda 后,你就可以创建你自己的环境了,例
1 conda create -n xxx python=3.7
环境会装在 home 中你的用户文件夹下,可以通过
查看对应的地址
以上操作的问题是,那个用户需要使用 conda,就需要按以上步骤执行一遍,并没有设置成所有用户都可以调用的方式;
安装 Jenkins 5.1、jenkins 下载安装 参考链接:官方文档
5.1.1、下载 yum 源 1 2 sudo wget -O /etc/yum.repos.d/jenkins.repo \ https://pkg.jenkins.io/redhat-stable/jenkins.repo
5.1.2、导入 key 1 sudo rpm --import https://pkg.jenkins.io/redhat-stable/jenkins.io.key
5.1.3、更新 yum 源 5.1.4、安装依赖 1 sudo yum install java-11-openjdk
5.1.5、安装 jenkins 1 sudo yum install jenkins
5.1.6、重载 systemctl 1 sudo systemctl daemon-reload
5.1.7、加入开机自启动 1 sudo systemctl enable jenkins
5.1.8、启动 jenkins 1 sudo systemctl start jenkins
5.1.9、查看管理员密码 1 cat /var/lib/jenkins/secrets/initialAdminPassword
5.1.10、访问 jenkins 默认 url:http:{IP}:8080
5.2.11、git 配置 1 2 3 4 5 6 7 8 cd /var/lib/jenkins vim .gitconfig # 输入以下内容 [http] sslVerify = false [https] sslVerify = false
5.2、常用插件安装 5.2.1、Rebuilder
官方地址:https://plugins.jenkins.io/rebuild 安装方式:在 Jenkins 插件当中直接搜索即可安装。 功能说明:此插件可以直接重复上次构建,也可以用于查看一些参数比较复杂的构建时,上次构建所选的参数是什么。非常 nice 的一个插件。
5.2.2、AnsiColor
官方地址:https://plugins.jenkins.io/ansicolor 安装方式:在 Jenkins 插件当中直接搜索即可安装。 功能说明:扩展支持我们在 shell 当中定义的 echo -e 指令,从而给一定的输出上颜色。 使用方式: 点此跳转到使用介绍。(opens new window)
5.2.3、Maven Release Plug-in maven 风格插件。
安装方式:在 Jenkins 插件当中直接搜索即可安装。
5.2.4、 build user vars
官方地址:https://wiki.jenkins.io/display/JENKINS/Build+User+Vars+Plugin 安装方式:在 Jenkins 插件当中直接搜索即可安装。 功能说明:通过此插件,让整个 Jenkins 系统中的用户参数成为一个可调用的变量。 使用方式:在构建环境中选中 Set Jenkins user build variables。
选中之后,即可在当次构建的全程里调用对应的变量了。
变量分为如下几种:
Full name :全名
BUILD_USER_FIRST_NAME:名字
BUILD_USER_LAST_NAME :姓
BUILD_USER_ID :Jenkins 用户 ID
BUILD_USER_EMAIL :用户邮箱
5.2.5、Active Choices
官方地址:https://wiki.jenkins.io/display/JENKINS/Active+Choices+Plugin 安装方式:在 Jenkins 插件当中直接搜索即可安装。 功能说明:根据所选参数,自动调出对应参数所依赖的后续参数。 使用方式: 点此跳转到使用介绍。(opens new window)
5.2.6、Build Name and Description Setter
官方地址:http://wiki.jenkins.io/display/JENKINS/Build+Name+Setter+Plugin 安装方式:在 Jenkins 插件当中直接搜索即可安装。 功能说明:通过这个插件,可以动态更改项目构建的名称。不要小瞧这个功能,有时候合理应用对于工作的效率提升,可是非常高的。比如,常用的钉钉插件推送的信息过于简单,有一些信息无法从中得知,其实它推送的就是项目构建的名称,这个时候我们可以通过更改项目名称,来直接将一些构建的变量进行传递。 使用方式: 可以通过这样一个妙用示例对其进行理解。(opens new window)
5.2.7、Email Extension Template 5.2.8、description setter 5.2.9、Git Parameter
官方地址:http://wiki.jenkins-ci.org/display/JENKINS/Git+Parameter+Plugin 安装方式:在 Jenkins 插件当中直接搜索即可安装。 功能说明:在参数化构建步骤当中,可添加 Git 的 branch 或者 tag 来作为参数进行构建。 使用方式: 可以通过这样一个妙用示例对其进行理解。(opens new window)
5.2.10、 Role-based Authorization Strategy5.2.11、Job Configuration History
官方地址:https://wiki.jenkins.io/display/JENKINS/JobConfigHistory+Plugin 安装方式:在 Jenkins 插件当中直接搜索即可安装。 功能说明:jenkins 配置当中的后悔药,如果你更改了某个配置,但是现在又想更改回去,没有备份而且忘了,那么可以使用这个插件。 使用方式:提供有 diff 对比功能,以及回滚功能。 非常友好的配置更改历史记录: 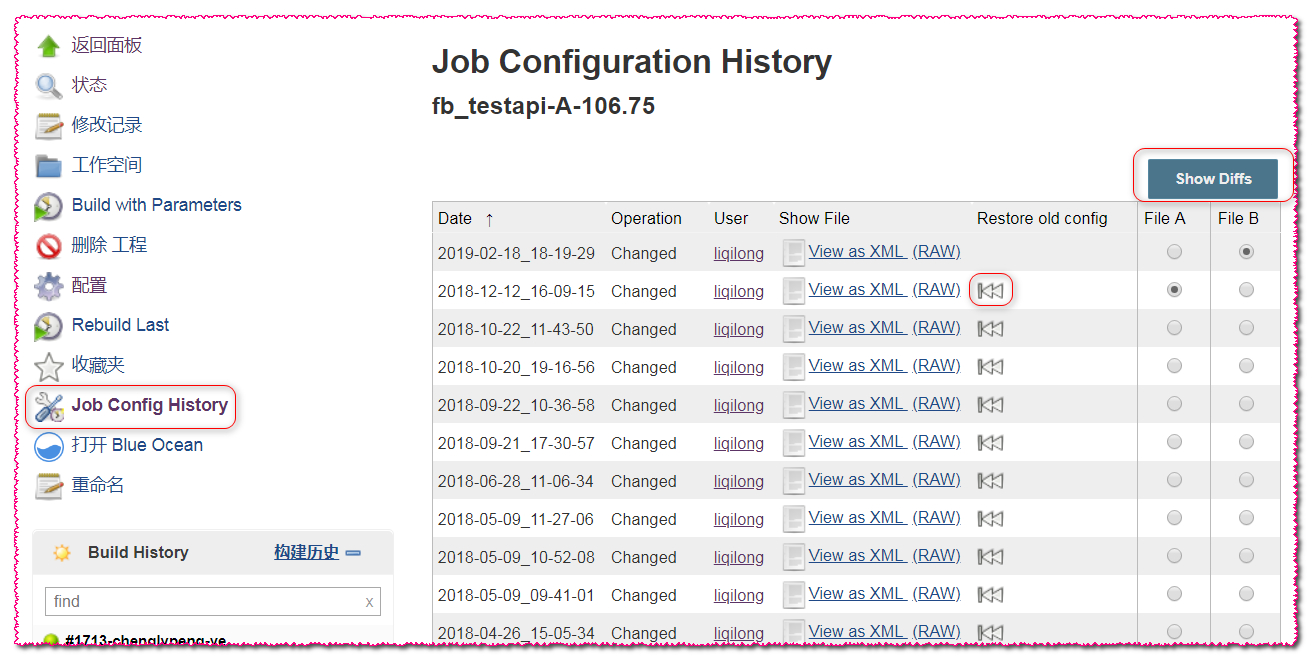查看不同,以及配置回滚这里就不演示了。
5.2.12、Simple Theme
官方地址:http://afonsof.com/jenkins-material-theme/?tdsourcetag=s_pctim_aiomsg 安装方式:在 Jenkins 插件当中直接搜索即可安装。 功能说明:可以自定义 Jenkins 主题的插件。 使用方式:使用方式见官方网站的说明,配置起来非常简单。
5.2.13、Build Trigger Badge
官方地址:https://wiki.jenkins-ci.org/display/JENKINS/Build+Trigger+Badge+Plugin 安装方式:在 Jenkins 插件当中直接搜索即可安装。 功能说明:能够在项目视图首页展示项目构建人的插件。 使用方式:事实上这个功能之前我已经在可以通过这样一个妙用示例对其进行理解这篇文章里通过智慧使用其他方式实现了,只不过现在这个插件可以直接实现对应的功能。如果首页视图当中看不到,可以通过编辑视图,添加 cause 即可看到。
5.2.14、Console Column
官方地址:https://wiki.jenkins.io/display/JENKINS/Console+Column+Plugin 安装方式:在 Jenkins 插件当中直接搜索即可安装。 功能说明:能够在项目视图首页展示项目构建输出面板的地址。 使用方式:首页视图中,可以通过 编辑视图,添加 Last Console即可看到。
5.2.15、Display Console Output
官方地址:https://plugins.jenkins.io/display-console-output 安装方式:在 Jenkins 插件当中直接搜索即可安装。 功能说明:点击项目构建之后,可以直接在当前窗口显示构建日志。 使用方式:安装之后默认启用,随便点击一个自由风格的项目构建即可看到效果。
5.2.16、Version Number
官方地址:https://plugins.jenkins.io/versionnumber/ 安装方式:在 Jenkins 插件当中直接搜索即可安装。 功能说明:通过插件的方式提供更加丰富的构建版本号 使用方式:安装之后默认启用,随便点击一个自由风格的项目构建即可看到效果。
5.2.17、 Figlet Buildstep
官方地址:https://plugins.jenkins.io/figlet-buildstep/ 安装方式:在 Jenkins 插件当中直接搜索即可安装。 功能说明:这个插件允许你在构建过程中输出一个简单的横幅。 使用方式:使用方法我们可以在流水线语法中直接获取: figlet ‘“start build”‘ 1
如上代码放到任意地方,会得到如下输出:
5.2.18、Hidden Parameter
官方地址: https://plugins.jenkins.io/hidden-parameter(opens new window) 安装方式:在 Jenkins 插件当中直接搜索即可安装。 功能说明:提供了一个隐藏参数项的功能,即可以添加一个参数,而并不会在构建页面显示。这种适用于一些不必展示的参数,使用接口调用构建时,也能通过调整该参数进行自定义构建。 使用方式
- 如果是 freestyle 风格的,则直接在页面配置即可: 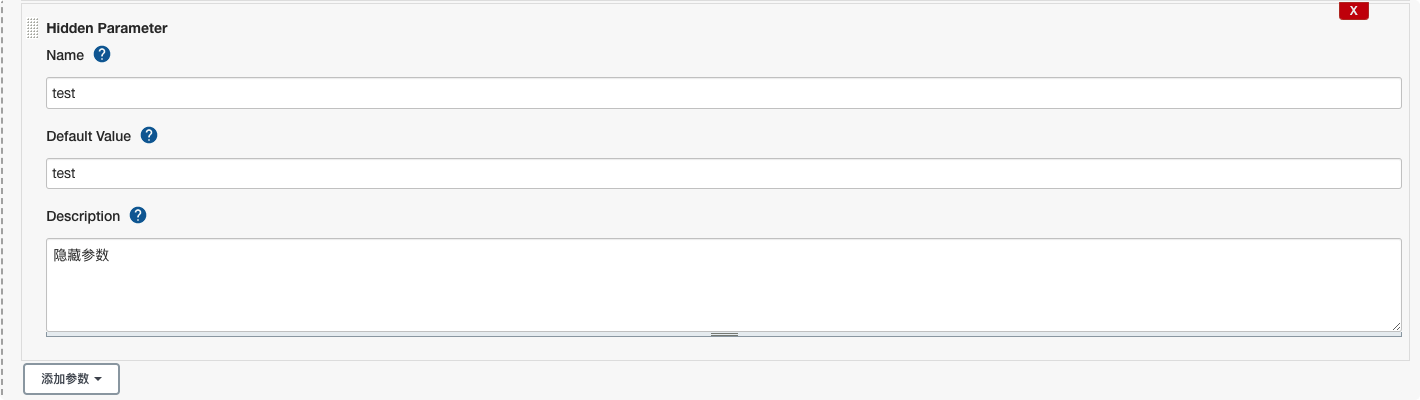
- 如果是 pipeline 风格,则可通过如下方式进行定义,如下定义方式
1 2 3 4 5 6 7 8 9 10 11 12 13 14 15 16 17 18 19 20 21 22 23 24 25 26 27 28 29 30 31 32 33 34 35 36 37 38 39 40 41 42 43 44 45 46 47 48 49 50 51 52 53 54 55 56 57 58 59 60 61 62 63 64 65 66 67 68 69 70 71 72 73 74 75 76 77 78 79 80 81 82 83 84 85 86 87 88 89 90 91 92 93 def ChoiseEnv() { return [ [$class: 'WHideParameterDefinition' , name: 'COMMID' , defaultValue: '666' ,description: '提交ID' ] ] } properties([ parameters(ChoiseEnv()) ]) pipeline { agent any environment { SERVICE_NAME="${JOB_BASE_NAME}" MODE="DEPLOY" REASON="无" REMOTE_HOST="占位" _VERSION="测试验证" ROBOT_KEY="6a781aaf-0cda-41ab-9bd2-ed81ee7fc7" GIT_URL = "https://gitlab.eryajf.net/ops/test.git" } parameters { string(name: 'BRANCH' , defaultValue: 'master' , description: '请输入将要构建的代码分支' ) } options { timestamps() timeout(time: 10 , unit: 'MINUTES' ) buildDiscarder(logRotator(numToKeepStr: '15' )) gitLabConnection('gitlab-token' ) } triggers{ gitlab(triggerOnPush: false ,triggerOnMergeRequest: true ,branchFilterType: 'All' ,secretToken: "${env.GIT_TOKEN}" ) } stages { stage('拉取代码' ) { steps { script { try { checkout( [$class: 'GitSCM' , doGenerateSubmoduleConfigurations: false , submoduleCfg: [], extensions: [[$class: 'CloneOption' , depth: 1 , noTags: false , reference: '' , shallow: true ]], branches: [[name: "$BRANCH" ]],userRemoteConfigs: [[url: "${env.GIT_URL}" , credentialsId: "cicd-pass" ]]] ) env.COMMIT_ID = sh(script: 'git log --pretty=format:%h' , returnStdout: true ).trim() env.COMMIT_USER = sh(script: 'git log --pretty=format:%an' , returnStdout: true ).trim() env.COMMIT_TIME = sh(script: 'git log --pretty=format:%ai' , returnStdout: true ).trim() env.COMMIT_INFO = sh(script: 'git log --pretty=format:%s' , returnStdout: true ).trim() }catch (exc) { env.REASON = "拉取代码出错" throw (exc) } } } } stage('检测项目' ) { steps { script { try { sh ''' cat README.md echo ${COMMID} ''' sh "printenv" }catch (exc) { env.REASON = "检测项目出错" throw (exc) } } } } } post { always { script{ wrap([$class: 'BuildUser' ]){ buildName "#${BUILD_ID}-${BRANCH}-${BUILD_USER}" currentBuild.description = "提交者: ${COMMIT_USER}" currentBuild.description += "\n构建主机: ${REMOTE_HOST}" currentBuild.description += "\n提交ID: ${COMMIT_ID}" currentBuild.description += "\n提交时间: ${COMMIT_TIME}" currentBuild.description += "\n提交内容: ${COMMIT_INFO}" } sh "printenv" } cleanWs() } } }
5.2.19、Config File Provider
官方地址:https://plugins.jenkins.io/config-file-provider 安装方式:在 Jenkins 插件当中直接搜索即可安装。 功能说明:提供全局配置管理的一种优雅方式,通常在 pipeline 中的一些认证会用到这个配置。 使用方式:添加一些诸如 k8s 认证文件 config 配置的功能。
5.2.20、 Extended Choice Parameter
官方地址:https://plugins.jenkins.io/extended-choice-parameter 安装方式:在 Jenkins 插件当中直接搜索即可安装。 功能说明:提供了一种灵活地参数化能力。回滚使用的这个插件。 使用方式:实现回滚版本选项列表的插件。
5.2.21、Docker Pipeline
官方地址:https://plugins.jenkins.io/docker-workflow 安装方式:在 Jenkins 插件当中直接搜索即可安装。 功能说明:提供了 pipeline 中 docker 环境隔离的能力。 使用方式:使用方式参考 [这里(opens new window)](https://wiki.eryajf.net/pages/3298.html#_11-docker)。
5.2.22、MySQL Database
官方地址:https://plugins.jenkins.io/database-mysql/ 安装方式:在 Jenkins 插件当中直接搜索即可安装。 功能说明:提供了 pipeline 中调用 MySQL 进行增删改查的能力。 使用方式:使用方式参考 [这里(opens new window)](https://wiki.eryajf.net/pages/ef36d8/)。
5.2.23、Multiple SCMs
5.2.24、Generic Webhook Trigger