1.初始化 1 yum install -y net-tools
1.2.安装wget 1.3.安装vim 1.4.同步时间 1 2 3 4 5 6 7 8 9 10 11 12 13 14 15 16 17 18 19 20 21 22 23 # 安装ntpdate yum -y install ntpdate # 同步时间 ntpdate -u pool.ntp.org # 同步完成后,date 命令查看时间是否正确 date # 中国 cn.ntp.org.cn # 中国香港 hk.ntp.org.cn # 美国 us.ntp.org.cn # 安装crontab yum -y install crontab # 创建crontab任务 crontab -e # 添加定时任务 */20 * * * * /usr/sbin/ntpdate pool.ntp.org > /dev/null 2>&1 # 重启crontab service crond reload
1.5.安装yum源 1.5.1.腾讯源 :::color2https://cloud.tencent.com/document/product/213/2046
:::
备份原始文件
1
2
mkdir /etc/yum.repos.d/backup mv /etc/yum.repos.d/*.repo /etc/yum.repos.d/backup/
下载CentOS 7的repo文件
1
2
3
4
5
6
centos6: wget -O /etc/yum.repos.d/CentOS-Base.repo https://mirrors.cloud.tencent.com/repo/centos6_base.repo centos7: wget -O /etc/yum.repos.d/CentOS-Base.repo https://mirrors.tencent.com/repo/centos7_base.repo centos stream 8/9:用镜像中自带的 repo 文件即可。
生成缓存
1 yum clean all && yum makecache
1.5.2.阿里源
备份原始文件
1 cp /etc/yum.repos.d/CentOS-Base.repo /etc/yum.repos.d/CentOS-Base.repo.bak
下载CentOS 7的repo文件
1 wget --no-check-certificate -O /etc/yum.repos.d/CentOS-Base.repo https://mirrors.aliyun.com/repo/Centos-7.repo
或者
1 curl -o /etc/yum.repos.d/CentOS-Base.repo https://mirrors.aliyun.com/repo/Centos-7.repo
备注:其余系统下载地址如下所示
- centos6
1 wget --no-check-certificate -O /etc/yum.repos.d/CentOS-Base.repo https://mirrors.aliyun.com/repo/Centos-6.repo
或者
1 curl -o /etc/yum.repos.d/CentOS-Base.repo https://mirrors.aliyun.com/repo/Centos-6.repo
- centos8
1 wget --no-check-certificate -O /etc/yum.repos.d/CentOS-Base.repo https://mirrors.aliyun.com/repo/Centos-8.repo
或者
1 curl -o /etc/yum.repos.d/CentOS-Base.repo https://mirrors.aliyun.com/repo/Centos-8.repo
非阿里云ECS用户会出现 Couldn’t resolve host ‘mirrors.cloud.aliyuncs.com’ 信息,不影响使用。用户也可自行修改相关配置
1 sed -i -e '/mirrors.cloud.aliyuncs.com/d' -e '/mirrors.aliyuncs.com/d' /etc/yum.repos.d/CentOS-Base.repo
使用阿里开源镜像提供的epel源
1 wget --no-check-certificate -O /etc/yum.repos.d/epel-7.repo http://mirrors.aliyun.com/repo/epel-7.repo
清除缓存
生成缓存
1.6.生成SSH key 1 ssh-keygen -t rsa -C "xxxxx@qq.com"
1.7.安装zerotier(选装) 1 2 # 下载脚本并安装 curl -s https://install.zerotier.com | sudo bash
1.8.安装v2ray(选装) 参考网址
1 2 3 4 5 6 7 8 9 10 11 12 # 1.下载脚本并安装 bash <(curl -s -L https://git.io/v2ray.sh) # 2.输入 “1” 进行安装 # 3.选择传输协议:TCP # 4.设置端口号 # 5.广告拦截:选N # 6.开启SS:选N
2.可选安装 2.1.安装宝塔面包(选装) :::color2https://www.bt.cn/new/download.html
:::
1 yum install -y wget && wget -O install.sh http://download.bt.cn/install/install_6.0.sh && sh install.sh
2.2.安装Java环境(可选) 1 2 3 4 5 6 7 8 9 10 11 12 13 14 15 16 17 18 19 20 # 1.安装上传组件 yum -y install lrzsz # 2.上传文件并解压 rz mkdir -p /usr/java tar -zxvf jdk-8u281-linux-x64.tar.gz -C /usr/java # 3.设置环境变量 vim /etc/profile export JAVA_HOME=/usr/java/jdk1.8.0_281 export PATH=$JAVA_HOME/bin:$PATH export CLASSPATH=.:$JAVA_HOME/lib/dt.jar:$JAVA_HOME/lib/tools.jar # 4.让环境变量生效 source /etc/profile # 5.验证 java -version
3.安装docker环境(可选)
PS:一定要yum update -y一下,否则可能会出现宿主机访问不到容器的问题
3.1.安装docker docker官方安装文档
3.1.1.删除旧软件包 1 2 3 4 5 6 7 8 sudo yum remove docker \ docker-client \ docker-client-latest \ docker-common \ docker-latest \ docker-latest-logrotate \ docker-logrotate \ docker-engine
3.1.2.设置repository 1 sudo yum install -y yum-utils
1 2 3 4 5 6 sudo yum-config-manager \ --add-repo \ https://download.docker.com/linux/centos/docker-ce.repo # 如果安装失败,则更换为阿里源 wget -O /etc/yum.repos.d/docker-ce.repo https://mirrors.aliyun.com/docker-ce/linux/centos/docker-ce.repo
3.1.3安装docker容器 1 sudo yum install docker-ce docker-ce-cli containerd.io
3.1.4.启动docker并加入开机自启
启动docker
1 sudo systemctl start docker
加入开机自启
1 sudo systemctl enable docker
3.1.5.设置国内源 3.1.5.1.创建文件夹 1 sudo mkdir -p /etc/docker
3.1.5.2.设置daemon.json 1 2 3 4 5 6 sudo tee /etc/docker/daemon.json <<-'EOF' { "registry-mirrors": ["https://ft4regk8.mirror.aliyuncs.com"], "insecure-registries": ["http://harbor.khalidlife.com:10102","10.10.7.161:10102"] } EOF
常规设置:
1 2 3 4 5 sudo tee /etc/docker/daemon.json <<-'EOF' { "registry-mirrors": ["https://ft4regk8.mirror.aliyuncs.com"] } EOF
3.1.5.3.重载systemctl 1 sudo systemctl daemon-reload
3.1.5.4.重启docker 1 sudo systemctl restart docker
3.1.6.打开docker远程连接 3.1.6.1.打开文件 1 vim /usr/lib/systemd/system/docker.service
3.1.6.2.添加参数 在/usr/lib/systemd/system/docker.service,配置远程访问。
主要是在[Service]这个部分,加上下面两个参数-H tcp://0.0.0.0:2375 -H unix://var/run/docker.sock
1 ExecStart=/usr/bin/dockerd -H fd:// --containerd=/run/containerd/containerd.sock -H tcp://0.0.0.0:2375 -H unix://var/run/docker.sock
3.1.6.3.重载systemctl 1 sudo systemctl daemon-reload
3.1.6.4.重启docker 1 sudo systemctl restart docker
3.1.6.5.查看状态 1 curl http://localhost:2375/version
3.2.安装docker-compose docker-compose官方安装文档
3.2.1.下载docker-compose 1 sudo curl -L "https://github.com/docker/compose/releases/download/1.29.2/docker-compose-$(uname -s)-$(uname -m)" -o /usr/local/bin/docker-compose
3.2.2.设置执行权限 1 sudo chmod +x /usr/local/bin/docker-compose
3.2.3.设置软连接 1 sudo ln -s /usr/local/bin/docker-compose /usr/bin/docker-compose
3.2.4.测试 1 docker-compose --version
4.安装python环境(Anaconda ) 4.1.Anaconda下载 进入anaconda官方网站下载个人免费版本,点击download,选择Linux平台的安装包
官网链接:Anaconda官网下载
内网链接:
- [linux链接](https://zdir.khalidlife.cn/soft/环境/python环境/Anaconda/Anaconda3-2022.10-Linux-x86_64.sh)
- [Windows链接](https://zdir.khalidlife.cn/soft/环境/python环境/Anaconda/Anaconda3-2022.10-Windows-x86_64.exe)
- [Mac链接](https://zdir.khalidlife.cn/soft/环境/python环境/Anaconda/Anaconda3-2022.10-MacOSX-x86_64.pkg)
4.2.Anaconda安装 4.2.1.执行如下指令,安装anaconda 1 2 bash Anaconda3-2020.11-Linux-x86_64.sh -p /opt/anaconda3
4.2.2.按照安装提示,键入回车 1 2 Please, press ENTER to continue >>> ENTER
4.2.3.安装此版本时,会强制用户看完整个协议,直接一路回车就行,直到看到确认信息 1 2 3 Do you accept the license terms? [yes |no][no] >>> yes
4.2.4.确认安装路径(可修改,也可以使用自定义) 1 2 3 4 5 6 7 8 9 Anaconda3 will now be installed into this location: /root/anaconda3 - Press ENTER to confirm the location - Press CTRL-C to abort the installation - Or specify a different location below [/root/anaconda3] >>> /opt/anaconda3
注:安装位置可以在执行安装脚本的时候直接指定,可以这样修改执行内容:
1 bash Anaconda3-2020.11-Linux-x86_64.sh -p /opt/anaconda3
这样可跳过软件安装路径确认阶段,直接安装到指定目录下。
4.2.5.环境变量初始化 1 2 3 4 5 6 Do you wish the installer to initialize Anaconda3 by running conda init? [yes |no][no] >>> yes
4.2.6.初始化时,anaconda将配置写入了~/.bashrc 文件,直接执行 后即可正常使用了。
4.2.7.配置多用户使用 将anaconda初始化时,写入到 ~/.bashrc 文件中的内容复制到 /etc/bashrc 文件中,内容如下(此处仅为示例,请复制本机对应文件中的相应内容)
1 2 3 4 5 6 7 8 9 10 11 12 13 14 __conda_setup="$('/opt/anaconda3/bin/conda' 'shell.bash' 'hook' 2> /dev/null) " if [ $? -eq 0 ]; then eval "$__conda_setup " else if [ -f "/opt/anaconda3/etc/profile.d/conda.sh" ]; then . "/opt/anaconda3/etc/profile.d/conda.sh" else export PATH="/opt/anaconda3/bin:$PATH " fi fi unset __conda_setup
再执行 source /etc/bashrc 指令即可。
4.3.配置镜像源 conda配置镜像源:
使用conda进行安装时,访问的是国外的网络,所以下载和安装包时会特别慢。我们需要更换到国内镜像源地址,这里我更换到国内的清华大学地址。(永久添加镜像)
Windows和Linux 对于conda修改镜像源的方法一样
4.3.1.查看anaconda中已经存在的镜像源 1 conda config --show channels
4.3.2.添加镜像源(永久添加) 1 2 3 conda config --add channels https://mirrors.tuna.tsinghua.edu.cn/anaconda/pkgs/free/ conda config --add channels https://mirrors.tuna.tsinghua.edu.cn/anaconda/pkgs/main/ conda config --add channels https://mirrors.tuna.tsinghua.edu.cn/anaconda/cloud/conda-forge/
4.3.3.设置搜索时显示通道地址 1 conda config --set show_channel_urls yes
4.3.4.若不想按照上述步骤添加镜像,可使用以下命令直接指定安装时使用的镜像地址(以opencv为例): 1 conda install opencv -c https://mirrors.tuna.tsinghua.edu.cn/anaconda/pkgs/main/
4.3.5.添加完后查看 1 conda config --show channels
4.3.6.pip使用国内镜像源 一般在使用conda install安装时会出现包无法找到或者安装失败的情况,此时可以使用pip install来尝试安装(以opencv为例):
若安装速度过慢可单独指定安装镜像加快安装:
1 pip install opencv -i https://mirrors.aliyun.com/pypi/simple/
此处列举国内常用pip安装镜像:
1 2 3 4 5 6 7 8 9 10 11 12 13 14 15 channels: - defaults show_channel_urls: true default_channels: - https://mirrors.tuna.tsinghua.edu.cn/anaconda/pkgs/main - https://mirrors.tuna.tsinghua.edu.cn/anaconda/pkgs/free - https://mirrors.tuna.tsinghua.edu.cn/anaconda/pkgs/r - https://mirrors.tuna.tsinghua.edu.cn/anaconda/cloud/Paddle/ custom_channels: conda-forge: https://mirrors.tuna.tsinghua.edu.cn/anaconda/cloud msys2: https://mirrors.tuna.tsinghua.edu.cn/anaconda/cloud bioconda: https://mirrors.tuna.tsinghua.edu.cn/anaconda/cloud menpo: https://mirrors.tuna.tsinghua.edu.cn/anaconda/cloud pytorch: https://mirrors.tuna.tsinghua.edu.cn/anaconda/cloud simpleitk: https://mirrors.tuna.tsinghua.edu.cn/anaconda/cloud
3.3.root用户安装的anaconda如何给普通用户使用 服务器里安装了anaconda,结果发现只有root用户才能使用,其他的用户都无法使用conda命令!
【解决方案】
首先,root用户安装anaconda的时候,需要安装在普通用户可以访问的目录下,比如/usr/local./opt./home之类的
其次,普通用户登陆后,需要执行以下conda init 使conda的路径等系统环境变量信息写入当前用户的bashrc下
例:
anaconda 装在了 (需要查看anaconda3安装路径)
普通用户 需要执行
1 /opt/anaconda3/bin/conda init bash
你需要根据自己的实际情况修改bin之前的目录
普通用户再执行启用配置命令
然后重新连接SSH (推荐)
或者
即使你没有重新连接ssh也可以通过(没试过)
或
能正常使用conda后,你就可以创建你自己的环境了,例
1 conda create -n xxx python=3.7
环境会装在home中你的用户文件夹下,可以通过
查看对应的地址
以上操作的问题是,那个用户需要使用conda,就需要按以上步骤执行一遍,并没有设置成所有用户都可以调用的方式;
5.安装Jenkins 5.1.jenkins下载安装 参考链接:官方文档
5.1.1.下载yum源 1 2 sudo wget -O /etc/yum.repos.d/jenkins.repo \ https://pkg.jenkins.io/redhat-stable/jenkins.repo
5.1.2.导入key 1 sudo rpm --import https://pkg.jenkins.io/redhat-stable/jenkins.io.key
5.1.3.更新yum源 5.1.4.安装依赖 1 sudo yum install java-11-openjdk
5.1.5.安装jenkins 1 sudo yum install jenkins
5.1.6.重载systemctl 1 sudo systemctl daemon-reload
5.1.7.加入开机自启动 1 sudo systemctl enable jenkins
5.1.8.启动jenkins 1 sudo systemctl start jenkins
5.1.9.查看管理员密码 1 cat /var/lib/jenkins/secrets/initialAdminPassword
5.1.10.访问jenkins 默认url:http:{IP}:8080
5.2.11.git配置 1 2 3 4 5 6 7 8 cd /var/lib/jenkins vim .gitconfig # 输入以下内容 [http] sslVerify = false [https] sslVerify = false
5.2.常用插件安装 5.2.1.Rebuilder 5.2.2.AnsiColor 5.2.3.Maven Release Plug-in maven风格插件。
安装方式:在Jenkins插件当中直接搜索即可安装。
5.2.4. build user vars
选中之后,即可在当次构建的全程里调用对应的变量了。
变量分为如下几种:
Full name :全名
BUILD_USER_FIRST_NAME:名字
BUILD_USER_LAST_NAME :姓
BUILD_USER_ID :Jenkins用户ID
BUILD_USER_EMAIL :用户邮箱
5.2.5.Active Choices 5.2.6.Build Name and Description Setter
5.2.7.Email Extension Template 5.2.8.description setter 5.2.9.Git Parameter 5.2.10. Role-based Authorization Strategy5.2.11.Job Configuration History 5.2.12.Simple Theme
5.2.13.Build Trigger Badge 5.2.14.Console Column 5.2.15.Display Console Output
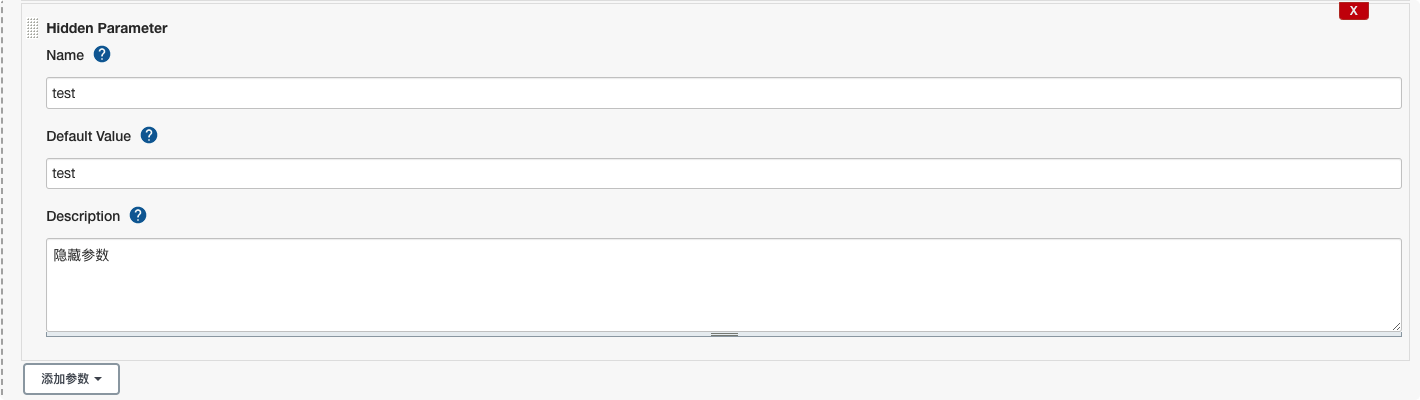
5.2.16.Version Number 5.2.17. Figlet Buildstep5.2.18.Hidden Parameter 1 2 3 4 5 6 7 8 9 10 11 12 13 14 15 16 17 18 19 20 21 22 23 24 25 26 27 28 29 30 31 32 33 34 35 36 37 38 39 40 41 42 43 44 45 46 47 48 49 50 51 52 53 54 55 56 57 58 59 60 61 62 63 64 65 66 67 68 69 70 71 72 73 74 75 76 77 78 79 80 81 82 83 84 85 86 87 88 89 90 91 92 93 def ChoiseEnv() { return [ [$class: 'WHideParameterDefinition' , name: 'COMMID' , defaultValue: '666' ,description: '提交ID' ] ] } properties([ parameters(ChoiseEnv()) ]) pipeline { agent any environment { SERVICE_NAME="${JOB_BASE_NAME}" MODE="DEPLOY" REASON="无" REMOTE_HOST="占位" _VERSION="测试验证" ROBOT_KEY="6a781aaf-0cda-41ab-9bd2-ed81ee7fc7" GIT_URL = "https://gitlab.eryajf.net/ops/test.git" } parameters { string(name: 'BRANCH' , defaultValue: 'master' , description: '请输入将要构建的代码分支' ) } options { timestamps() timeout(time: 10 , unit: 'MINUTES' ) buildDiscarder(logRotator(numToKeepStr: '15' )) gitLabConnection('gitlab-token' ) } triggers{ gitlab(triggerOnPush: false ,triggerOnMergeRequest: true ,branchFilterType: 'All' ,secretToken: "${env.GIT_TOKEN}" ) } stages { stage('拉取代码' ) { steps { script { try { checkout( [$class: 'GitSCM' , doGenerateSubmoduleConfigurations: false , submoduleCfg: [], extensions: [[$class: 'CloneOption' , depth: 1 , noTags: false , reference: '' , shallow: true ]], branches: [[name: "$BRANCH" ]],userRemoteConfigs: [[url: "${env.GIT_URL}" , credentialsId: "cicd-pass" ]]] ) env.COMMIT_ID = sh(script: 'git log --pretty=format:%h' , returnStdout: true ).trim() env.COMMIT_USER = sh(script: 'git log --pretty=format:%an' , returnStdout: true ).trim() env.COMMIT_TIME = sh(script: 'git log --pretty=format:%ai' , returnStdout: true ).trim() env.COMMIT_INFO = sh(script: 'git log --pretty=format:%s' , returnStdout: true ).trim() }catch (exc) { env.REASON = "拉取代码出错" throw (exc) } } } } stage('检测项目' ) { steps { script { try { sh ''' cat README.md echo ${COMMID} ''' sh "printenv" }catch (exc) { env.REASON = "检测项目出错" throw (exc) } } } } } post { always { script{ wrap([$class: 'BuildUser' ]){ buildName "#${BUILD_ID}-${BRANCH}-${BUILD_USER}" currentBuild.description = "提交者: ${COMMIT_USER}" currentBuild.description += "\n构建主机: ${REMOTE_HOST}" currentBuild.description += "\n提交ID: ${COMMIT_ID}" currentBuild.description += "\n提交时间: ${COMMIT_TIME}" currentBuild.description += "\n提交内容: ${COMMIT_INFO}" } sh "printenv" } cleanWs() } } }
5.2.19.Config File Provider 5.2.20. Extended Choice Parameter5.2.21.Docker Pipeline 5.2.22.MySQL Database 5.2.23.Multiple SCMs
5.2.24.Generic Webhook Trigger


 查看不同,以及配置回滚这里就不演示了。
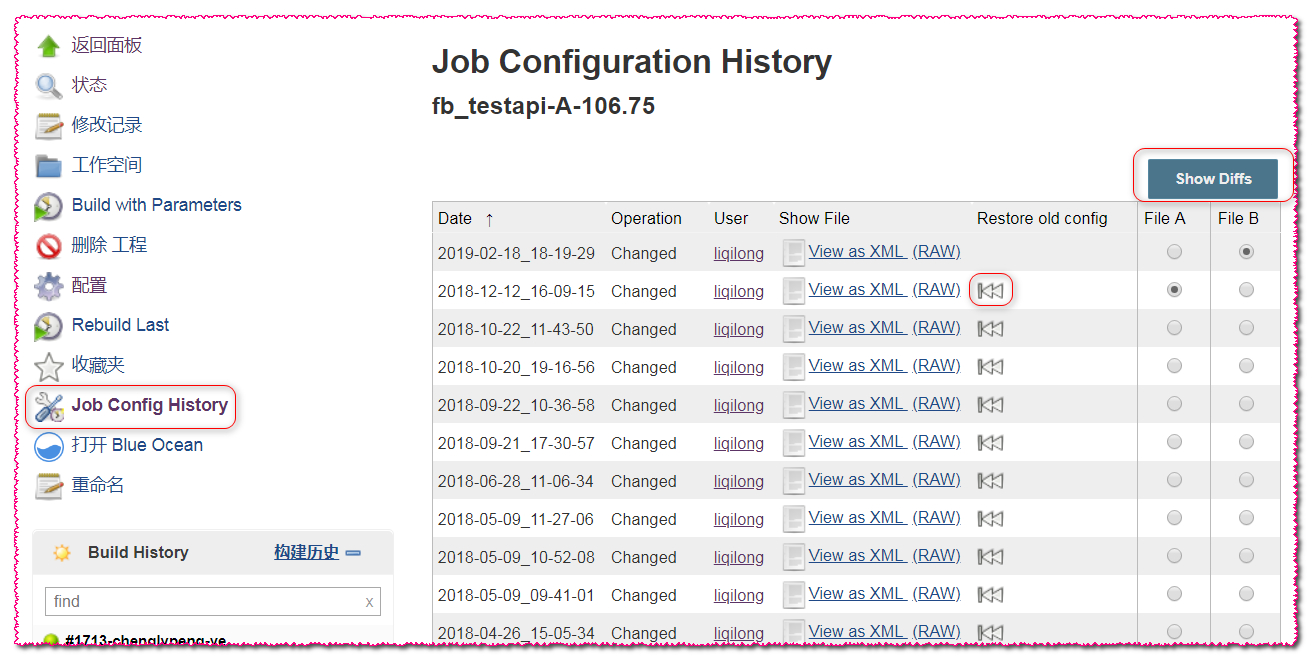 查看不同,以及配置回滚这里就不演示了。